The Niviuk Arrow P 2 is the successor to the P and the light version of the Arrow, which I have been flying for some time now. In contrast to the Arrow, the P version is the lightweight version and is therefore intended for hike-and-fly and bivouac pilots.
Please note the notes and restrictions on the test. The harness was made available to me for testing. As I have not flown the P, I cannot make a comparison here. It is advertised as having great seating comfort, more robust materials and safety improvements.
| Product | The Arrow P 2 from Spanish manufacturer Niviuk was tested. The Arrow is the successor model to the P and is a lightweight harness. The rear ridge is black with an orange arrow. Otherwise the harness is completely black. No design variants are offered on the homepage. |
| Utilisation | The lightweight construction means that the target groups are hike-and-fly and bivouac pilots. |
| Location | As this is a demo harness, I was not allowed to test the harness in flight. I therefore only tested it in the simulator. |
| Weather | – |
| Equipment | – |
| Weight, size | I weigh 80 kg and am 1.76 m tall. I was able to test the size M. |
| Flights | – |
| Certificate | The certificate and the test report for both protector variants can be downloaded here. |
| Safety instructions | No safety instructions have been published to date. |
| Scope of delivery | 2 straps to adjust the back position, black repair patch (probably for the leg bag), short piece of Velcro and inner container. |
| Manual | The operating instructions are only available for download in English (on the German-language Niviuk homepage). The certificates for the protectors and a link to a detailed video with user instructions can also be found on the homepage. |
Construction
| Technical data | The harness is available in three sizes (S, M and L) for pilots from 160 to 195 cm. The weights for size S are 1.82 kg, M 1.86 kg and L 1.99 kg with foam protector. Each is 600 g lighter with air protector. There is a table in the instructions which you can use to determine the correct size depending on your height and weight. The maximum load for all sizes is 120 kg. I don’t know whether the Korbus can be combined with leg bags of different sizes. |
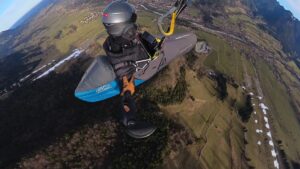
| Structure | The harness has no seat board, the seat is approx. 55 cm long and offers very good leg support. The depth of the carabiner suspension is approx. 38 cm, so the feeling of flying should be rather muted. The footrest is unusually large at 34 cm, so even the larger foot has enough space available. I had the version with foam protector, but the pack size still felt very compact. However, a hike-and-fly harness only really makes sense with an air protector. The leg bag is held in place with two magnets, which close immediately after insertion and seal the leg bag perfectly. |
| Material | According to the manufacturer, the leg bag is made of D70 (I assume this means 70D ripstop nylon fabric). The rump is made of Skytex 27 on the inside and Dokdo 36 on the outside. The carabiners are made of aluminium and have to be screwed on after closing. |
| Protector | The Arrow can be fitted with a foam or inflatable protector. The foam protector has a height of 14 cm. In accordance with the standard, the protector only covers the seat. AirDesign’s The Sock shows that a lightweight harness can do better than this. |
| Accelerator | The accelerator has three stages, whereby the tread is only slightly reinforced with a thin transparent tube. |
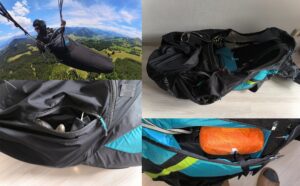
| Storage space | The lack of side pockets is somewhat unusual for me. Things you need in flight are stored in pockets (depth approx. 18 cm) directly on the carabiner (photo 1) or in the front pocket (photo 2). This means that there is very little storage space available in flight. On the positive side, there is a separate pocket for the power bank with a lead-through for the USB cable (photo 3). The storage space in the rear and underneath the seat is slightly better and could accommodate a full set of bivouac equipment (not tested). For light items (otherwise the harness could become top-heavy) there is also a small storage space in the nose of the leg bag. |
| Rescue parachute | The rescue chute is very spacious, but not too spacious like the Arrow. The rescue chute is located in the lower back area, which is suboptimal in the event of a fall on the back. The handle has a spacer, which makes it easy to grip, and is also coloured red (photo 7). Installation is a little tricky, but easy to do with the help of the video instructions. The zip at the bottom, which closes the rescue compartment, is particularly difficult to reach. A piece of plastic wire is enclosed in a small bag to close the rescue compartment. A good idea in case the reserve parachute falls out at the launch site. There is no reserve parachute bridle, as is usually the case, which connects the reserve parachute to the suspension system. The main line of the reserve parachute is connected directly to the suspension (photo 6). |
| Cockpit | The cockpit is relatively small. I didn’t bother to adjust the cockpit tension correctly, but even in the standard setting the position and angle were optimal (photo 2). |
| Mounting options | The water hose is stored in the back compartment, as is usual today. However, the hole for the hose to pass through is very small (photo 5). There is no attachment for the action cam or a pocket for an Anti-G. The Vario can be attached at the top right. |
| Quality | The quality of workmanship seems good as far as I can tell. I couldn’t find any defects in the stitching. The speed bar feed-through on the body is reinforced and the speed bar ropes are apparently guided by ceramic rings. Of course, as with any lightweight harness, the material is more sensitive and should be handled with care. |
Settings
| Leg bag | The length and angle can be adjusted very easily using an ingenious system. The loop around a ball can be loosened and the ball can then be moved to lengthen or shorten the ropes. The loop around the ball is tightened under load so that it is unlikely to loosen over time. The standard setting worked for me straight away. To minimise drag, the harness should be adjusted so that the underside is as parallel to the ground as possible. |
| Seat | The angle of the back support can be adjusted using the straps supplied. Various loops on the side of the carabiner allow fine adjustment. Simple, stepless adjustment, which I find advantageous in flight, e.g. for a long valley crossing to minimise wind resistance, is not possible. Other back adjustments are sometimes difficult to access in flight and should be made in advance in the simulator. |
| Chest strap | The distance between the carabiners can be adjusted in two stages, even during flight. This allows you to adjust the distance between the carabiners according to the thermal conditions. |
| Accelerator | The accelerator can be adjusted as a whole using the ball mentioned above, but not in flight. The steps cannot be adjusted individually. The speed bar is connected with an anchor stitch via the humming hook of the glider. |
| Cockpit | The angle of the cockpit can be easily adjusted to suit your own preferences. |
Flying
As already described above, I had a demo harness and was therefore only able to test the “flight feeling” on the simulator to a very limited extent.
| Prepare | I had the version with a foam protector. But for a dedicated hike-and-fly harness, an inflatable protector makes more sense. It is advisable to pack the rucksack and other items neatly in the rear storage space, otherwise something could push through unpleasantly. |
| Create | You get into the leg harness with one leg, so there is no need for an anti-forget system. It is quick and easy to put on and should also work with gloves. All the necessary steps can be carried out without any great effort. The carabiners are screwed together, which ensures a tight closure on the one hand and prevents them from opening quickly on the other (e.g. after a water or strong wind landing). |
| Start | It was easy to get on the simulator. What puzzles me is the rubber rope loop that is supposed to be used to pull in the leg bag. In the Niviuk product video, the pilot in socks pulls his foot out of the loop after boarding. This would hardly be possible with shoes. |
| Leg bag | The closure of the leg bag on the simulator is perfect, the fabric tension is clean and there are hardly any creases to be seen. The leg bag probably provides good protection against draughts. |
| Accelerate | Not tested. |
| Flight feeling | Not tested. |
| Manoeuvre | Not tested. |
| Settings | Adjustments in the air are practically impossible. Almost all settings have to be made in advance in the simulator. |
| Miscellaneous | As mentioned above, the cockpit angle is optimal. The accessibility of the accessories would be better with side pockets on the leg bag, but the inner pockets on the carabiner at least ensure that nothing falls out in flight. The rescue handle is easy to reach thanks to the spacer. |
| Landing | It is easy to get up and out of the simulator. |
| Packing | – |
Experience
I don’t know anyone in my immediate circle of acquaintances who flies the Arrow P 2. There are also no reports in the relevant forums, which is not surprising as the harness has only been on sale since November.
Conclusion
| Positive | A long seat ensures good leg support. Two magnets ensure that the leg bag closes very well. Very good view of the cockpit. Easy adjustment options for the leg bag. |
| Negative | Lack of storage space in flight. Few adjustment options in flight. The access to the leg straps and the screwed carabiners could lead to problems in the event of a water or strong wind landing. Protector only covers the rear part. |
| Neutral | – |
Overall, the Arrow P 2 is a well-designed hike-and-fly harness that is certainly worth a test flight.
Do you like the new table format of the test report? Would you like to see tests like this more often on my blog? I try to keep the cost of testing the harnesses low, but I would still appreciate a small donation from you as a token of your appreciation. You can find out how to donate here. Thank you very much.